Vector EHS Management: Safety Inspections Demo
Industry:
Solution:

Elevate Your Safety Inspections with Vector EHS Management
Safety inspections are a cornerstone of workplace safety and regulatory compliance. With Vector EHS Management, you can simplify the inspection process, making it easier to identify and address potential hazards before they lead to incidents. Our software offers a centralized platform where you can customize inspection forms and checklists, whether using our pre-built options linked to OSHA standards or importing your own.
Vector EHS Management software connects all areas of safety into one easy-to-use platform. Manage your entire environmental health and safety program in a configurable system to save time and improve efficiency in your safety department.
Request a Demo Today to learn more about how Vector EHS Management can enhance your safety program.
Video Transcript:
Below is the full transcript of the video, providing a detailed walkthrough of how Vector EHS Management can transform your safety inspections:
Conducting safety inspections is an important part of compliance, and in order to provide employees with a workplace that is free from recognizable hazards that are causing or likely to cause death or serious harm, worksite inspections serve as a main driver in identifying and remediating those hazards. However, conducting inspections can serve a greater purpose than simply meeting a compliance requirement as they can be a vital part of your company’s injury prevention efforts.
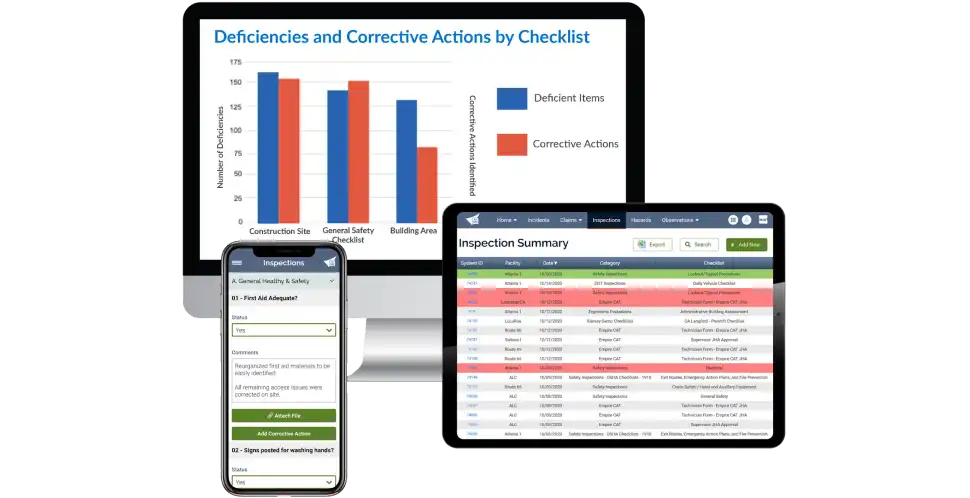
Luckily, there is software that can help with safety inspections, and Vector Solutions’ EHS Management can really help you centralize your inspection forms and checklists in a way that can be customized for each organization. The inspections module within Vector EHS Management includes forms and checklists, including pre-built checklists linked to detailed OSHA regulatory standards or your organization’s existing inspection checklists, which can be easily imported into the system and can be utilized for inspections and audits. Additionally, you can easily view inspection compliance rates and identify areas with the most deficiencies using our reporting tools.
With that in mind, I’m going to give a brief walkthrough of our Vector EHS management software, focusing on safety inspections. As you can see, you’ve already logged into our EHS management software here, and we’ll go to the inspections module. You’ll see all your current inspections, and the red-lined items indicate those that are currently overdue. Now, to create an inspection, we’ll click on the Add New button, and here you will be prompted to select our category and checklist. If we expand our category field, you’ll see all our options here, including some OSHA-related items, but we will be selecting safety inspections next.
For our checklist, we’ll again expand the field to see all of our checklist options under the safety inspections category. For our checklist, we’ll be selecting General Safety Audit. Now, before we continue, I do want to point out that checklists can be customized in a variety of ways to ensure they adhere to your organization’s needs and requirements. Next, we’ll click continue to go to our inspection form, and right away, you’ll see here all the basic information on the left side will automatically be populated based on your hierarchy settings. I can also set the location of the inspection by selecting Select Location here to quickly populate that information as well.
Now, since I’m creating this inspection, by default, I will be listed as the investigator, which is the user that will be conducting the inspection. However, this can be easily changed by typing in the name of a different employee. Next, we’ll enter the date and time of our inspection, and then we’ll select the status, which is either Open, Complete, or Scheduled. We’ll select Open, and I do want to point out these three grayed-out fields here for the number of items reviewed, number of deficiencies, and percent compliant, which are currently blank. These numbers will auto-populate as we go through our checklist items, so you don’t have to worry about coming back up here to make sure that they are accurate to what you do in the checklist.
Now we’ll scroll down to our General Safety Audit checklist, and you’ll notice across the top here that the checklist has been grouped into sections. So, you can click into these to highlight and isolate different sections of your checklist. Next, we’ll look at the status column where, for this checklist, our options are simple: yes, no, or not applicable. But these values can be customized to fit your organization’s specific needs and nomenclature. Now selecting these status values will also update our score column, and since we are dealing with a yes/no choice, the score would either be 100 for yes or zero for no. But again, these can be customized to suit your needs.
You can then add specific comments to each line item. For example, in this first checklist item, since we indicated that access to the breaker is obstructed by saying no for our status, we can add that the breaker panel is currently being obstructed by a ladder leaning up against it. Then we can add a picture of that obstruction by simply clicking the plus icon under Attachments. And we can also quickly add a corrective action to remediate this deficiency by clicking the plus icon under Corrective Action.
If we do want to add a corrective action to that checklist item, it will automatically open the corrective action recording form, and you’ll see that it’ll be linked to our current inspection and the associated item in our checklist. Now we can also click on the originating system ID to quickly return to our inspection checklist. Finally, across the top, you’ll notice the options to print your inspection checklist, print only its deficiencies, or make this inspection one that recurs over time.
OK, so now that we’ve gone through the inspection workflow, we can move on to our reporting tools. Here we’ll go into our reports modules, click on Standard Reports, and expand inspections, and here we’ll see options for the Inspections Detailed Logs, which shows us detailed information on individual inspection checklist line items, and our Inspection Log. The Inspection Log will provide you with an overview of your inspections, including items like what checklist the inspection utilized, the facility or location where the inspection was conducted, the investigator, the date, status, number of items reviewed, and number of deficiencies and corrective actions associated with the inspection. Additionally, you can quickly jump to the inspection form by clicking its associated system ID.
This report can also be filtered based on the values that you specify. You can add charts to visualize the data, and you can click the gear icon here to add, remove, or group columns. So, to conclude, Vector EHS Management can help improve and track compliance rates by utilizing a variety of pre-built checklists linked to detailed OSHA regulatory standards or your organization’s own custom checklists to conduct your safety inspections and ultimately lead to improved safety outcomes.
Thank you.


